Javascript setTimeout method - All you need to know
Mastering Javascript setTimeout method for Efficient Asynchronous Programming.

Introduction
JavaScript is a powerful programming language that allows developers to create dynamic and interactive web applications. One important feature of JavaScript is the Javascript setTimeout method function, which enables the javascript wait.
Understanding how to effectively use setTimeout is crucial for controlling the timing and flow of your JavaScript programs. In this comprehensive guide, we will dive deep into the world of Javascript setTimeout method and explore its various functionalities.
Whether you are a beginner or an experienced developer, this article will provide you with all the knowledge you need to harness the full potential of setTimeout in your JavaScript projects.
So, Get ready to master the art of timing in JavaScript and unlock new possibilities for creating responsive and efficient web applications.
Let's delve into the world of setTimeout and discover all its secrets!
Prerequisites
Before delving into the world of setTimeout, it's beneficial to have a basic understanding of JavaScript and its fundamental concepts. Familiarity with variables, functions, and basic control flow (such as if statements and loops) will make it easier to grasp the concepts discussed in this article.
If you're new to JavaScript or need a refresher, there are numerous online resources available to learn the basics. Websites like MDN Web Docs, W3Schools, and freeCodeCamp offer comprehensive tutorials and guides that can help you get started on your JavaScript journey.
Additionally, I highly recommend the following two books for beginners in JavaScript:
By diving into these resources, you'll gain a solid foundation in JavaScript programming, equipping you with the necessary knowledge to explore the intricacies of setTimeout and unlock new possibilities in your web development projects.
So, before we dive into the intricacies of setTimeout, make sure you have a solid foundation in JavaScript programming.
Once you're ready, let's explore the power of setTimeout and unlock new possibilities in your web development projects.
The purpose of setTimeout
To begin, let's understand the purpose of setTimeout first.
setTimeout is commonly used in scenarios where you want to introduce delays, schedule events, or perform tasks at specific time intervals.
little confusing right?
Let's understand this with an example:
Note: please avoid thinking about its syntax for now. we will discuss the Syntex later on.
Suppose you want to declare a function but instead of calling it immediately, you want to call it after a certain period of time.
This is where setTimeout comes into the picture. It provides the functionality to delay the execution of a function.
Take a look at the following code:
function greetUser() {
 console.log('Hello, user!')
}
setTimeout(greetUser, 1000)
In this example, we have a function called greetUser that simply logs a greeting message to the console. We want to delay the execution of this function by 1 seconds.
To achieve this, we use the setTimeout function and pass the greetUser function as the first argument and 1000 as the second argument.
And that's it!
When you run this code, it will make javascript wait 1 second and then print the greeting message "Hello, user!" to the console.
Syntax and Parameters of setTimeout
To effectively use setTimeout, it's important to grasp its syntax and parameters.
The basic syntax of setTimeout is as follows:
setTimeout(function, delay, param1, param2, ...);
Let's break down the different components:
The first parameter is the
functionor code snippet that you want to execute after the specified delay. It can be a named function or an anonymous function.The second parameter
delayrepresents the time interval inmillisecondsbefore the code execution begins. It determines the delay duration before the specified function is invoked.Additional parameters, such as
param1,param2, and so on, are optional. You can use them to pass arguments to the function specified in the first parameter.
These setTimeout parameters allow you to customize the behavior of the function when it is executed.
The setTimeout() returns a timeoutID which is a positive integer identifying the timer created as a result of calling the method. The timeoutID can be used to cancel timeout by passing it to the clearTimeout() method which we will discuss in another article.
Note: If you find the syntax confusing, don't worry!
In the upcoming sections of this blog, we will explore various examples and use cases for each parameter in detail. I assure you that by reading the full article, you will gain a clear understanding of how to use
setTimeouteffectively.So, be patient and keep reading to unlock the full potential of this powerful JavaScript function.
setTimeout code breakdown
I know you already got an idea of what happened to the code that we used before. But To reinforce our understanding let's break down the code together:
function greetUser() {
  console.log('Hello, user!')
}

setTimeout(greetUser, 1000)
In this code snippet:
We define a function called
greetUserusing the function keyword. This function is responsible for printing the greeting message to the console.We use the
setTimeoutfunction to schedule the execution of thegreetUserfunction after a specified delay. The delay is set to1000milliseconds, which is equivalent to1seconds.The first argument passed to
setTimeoutis the function referencegreetUser. This tells setTimeout which function to execute after the specified delay.The second argument
1000represents the delay in milliseconds. It determines the time period before the code execution begins.
By using setTimeout, we instruct JavaScript wait 1 second and then invoke the greetUser function. As a result, the greeting message "Hello, user!" will be printed on the console.
Using the anonymous function as a callback
In the previous code example, we used a named function as the callback function in the setTimeout function.
However, setTimeout also allows you to provide an anonymous function as a callback that will be executed after the specified delay.
Anonymous functions are commonly used when the code to be executed is simple and doesn't require a separate named function.
Here's an example:
setTimeout(function () {
 console.log('This code executes after the delay')
}, 1000)
In this case, the anonymous function serves as the callback. It logs a message to the console after a delay of 1000 milliseconds (or 1 seconds).
You can replace the console.log statement with any code you want to execute after the delay. Using anonymous functions as callbacks in setTimeout provides flexibility and allows you to define and execute code inline without the need for separate function declarations.
Passing arguments to the callback function
In the setTimeout callback function, You can easily pass parameters or arguments.
Suppose you have a function that accepts parameters, and you want to provide specific values to those parameters when the function is executed after the delay:
function greet(name) {
  console.log('Hello, ' + name + '!')
}

setTimeout(greet, 5000, 'John')
In this example, the greet function is scheduled to wait 5 seconds (5000 milliseconds), and the argument John is passed as the name parameter.
You can adjust the delay and the argument values according to your specific use case.
Using this approach, you can customize the behavior of the callback function by passing different values as arguments, allowing for more dynamic and flexible code execution.
Here are some additional tips for passing arguments to the callback function:
You can pass any number of arguments to the callback function.
The arguments will be passed to the callback function in the same order that they were passed to
setTimeout.If you pass a variable number of arguments to the callback function, you can use the arguments object to access them.
Here is an example below:
function processArgs() {
  for (let i = 0; i < arguments.length; i++) {
    console.log("Argument " + (i + 1) + ": " + arguments[i]);
  }
}

setTimeout(processArgs, 1000, "apple", "banana", "cherry");
In this example, the processArgs function prints each argument along with its corresponding index to the console. The output will be:
Argument 1: apple
Argument 2: banana
Argument 3: cherry
Passing string literals
Passing a string as the first argument to setTimeout instead of a function can lead to potential issues and is generally not recommended.
It has similar problems to using eval().
Here's an example of passing a string literals to setTimeout:
// Don't do this
setTimeout("console.log('Hello World!');", 500)
In this case, the string "console.log('Hello World!');" is evaluated as code in the global context when the timeout expires.
However, using a string in this way can cause problems because the evaluation happens in a different context, and local symbols or variables may not be available.
To avoid these issues, it's recommended to pass a function as the first argument to setTimeout instead. This ensures that the code is executed within the correct context and has access to local symbols.
Here's an alternative approach using a function as the callback:
// Do this instead
setTimeout(() => {
   console.log('Hello World!')
}, 500)
In this example, an arrow function is used as the callback. The arrow function provides a concise and safer way to execute code after the specified delay.
It avoids the pitfalls associated with passing string literals to setTimeout and ensures that the code is executed within the correct scope.
By passing a function instead of a string, you can maintain better control over the execution context and avoid potential issues with accessing local variables or symbols.
Maximum delay value
The maximum delay value that can be set in the Javascript setTimeout method function depends on the JavaScript implementation and the environment in which it is running.
In most modern browsers and JavaScript environments, the maximum delay value is approximately 2^31 - 1 milliseconds, which is roughly 24.85 days. If you attempt to set a delay value greater than this maximum, it will be automatically clamped to the maximum allowable value.
Therefore, if you need to schedule a task that exceeds this maximum delay, you might need to consider alternative approaches or use a combination of multiple setTimeout calls.
It's worth noting that extremely long delay values should be used with caution, as they may not be reliable or practical for many real-world scenarios. If you require precise timing or longer delays, you may want to explore other techniques or APIs specifically designed for such purposes.
Here are some alternative approaches for scheduling tasks that exceed the maximum delay value:
Use a combination of multiple
setTimeoutcalls. This can be used to break down a long task into smaller chunks that can be scheduled individually.Use a background thread or process. This can be used to execute tasks that do not need to interact with the main thread or user interface.
Use a third-party library or API. There are a number of libraries and APIs available that provide support for scheduling tasks with longer delays.
The best approach for scheduling a task that exceeds the maximum delay value will depend on the specific requirements of the task.
How setTimeout works behind the scenes
So far we have discussed so many things about Javascript setTimeout method.
But, To fully grasp the concept of Javascript setTimeout method, it's crucial to understand its underlying mechanism and how it works behind the scenes.
Now let's understand how this works behind the scenes.
Note: This section explores advanced concepts of JavaScript such as the
Event Loop,Call Stack, andWeb API. If you're not familiar with these concepts, feel free to skip this section as it won't affect your understanding of setTimeout and its usage.However, if you're interested in delving deeper into the inner workings of JavaScript and gaining insights into the mechanisms behind the
setTimeoutfunction, this section is specifically tailored for you.
JavaScript is a single-threaded programming language, which means it can only handle one task at a time.
However, web browsers have additional components like the Event Loop, Call Stack, and Web API that helps manage asynchronous tasks and enables non-blocking behavior.
When you use the setTimeout function in JavaScript. It follows a specific workflow involving these components.
Let's break it down step by step from a beginner's perspective:
The
setTimeoutfunction is added to thecall stack, which creates a timer in the Web API component of the browser. The specified delay is set, and the timer starts counting down.While the timer is running, the JavaScript engine continues executing other code if there is any. It doesn't wait for the timer to expire before moving forward.
After the specified time interval (e.g., javascript wait 5 seconds) elapses, the timer expires, and the callback function provided to
setTimeoutis moved from the Web API to thecallback queue. The callback queue holds the functions that are ready to be executed.The
Event Loopis responsible for continuously monitoring both thecall stackand thecallback queue. It checks if the call stack is empty.If the
call stackis empty, the event loop takes the callback function from the callback queue and pushes it onto thecall stackfor execution. This process ensures that the callback functions are executed in the order they were added to the queue.
Let's consider an example to better understand this process:
function task() {
  console.log('setTimeout Demo!')
}
setTimeout(task, 5000)
In this example, the task function is scheduled to execute after javascript wait 5 seconds (5000 milliseconds).
Here's how it unfolds:
The
setTimeoutfunction is added to thecall stack, creating a timer in theWeb API.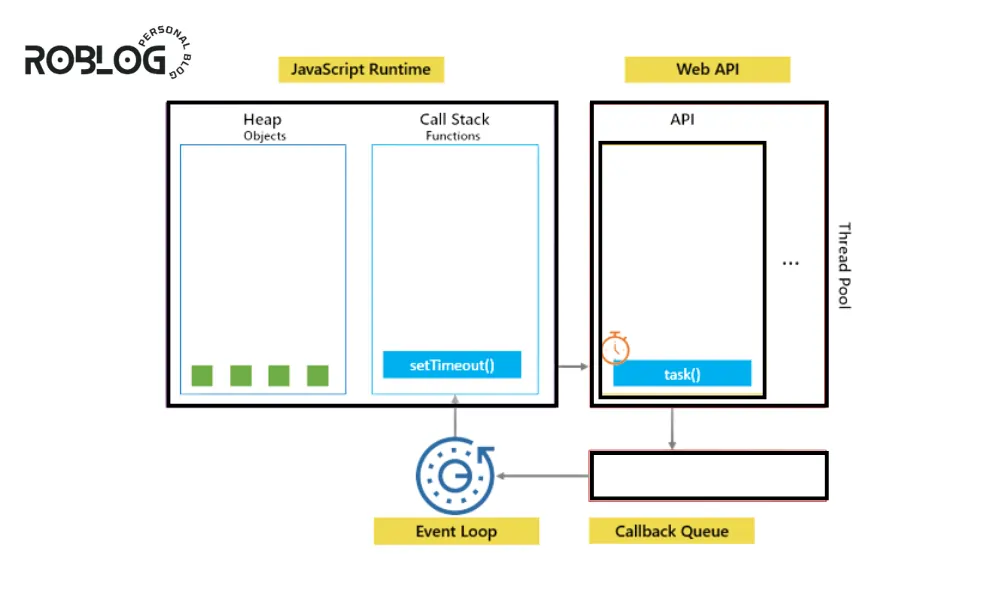
The timer starts counting down, and the JavaScript engine proceeds to execute other code if present.
After approximately 3 seconds, the timer expires, and the task function is moved
from theWeb APIto thecallback queue.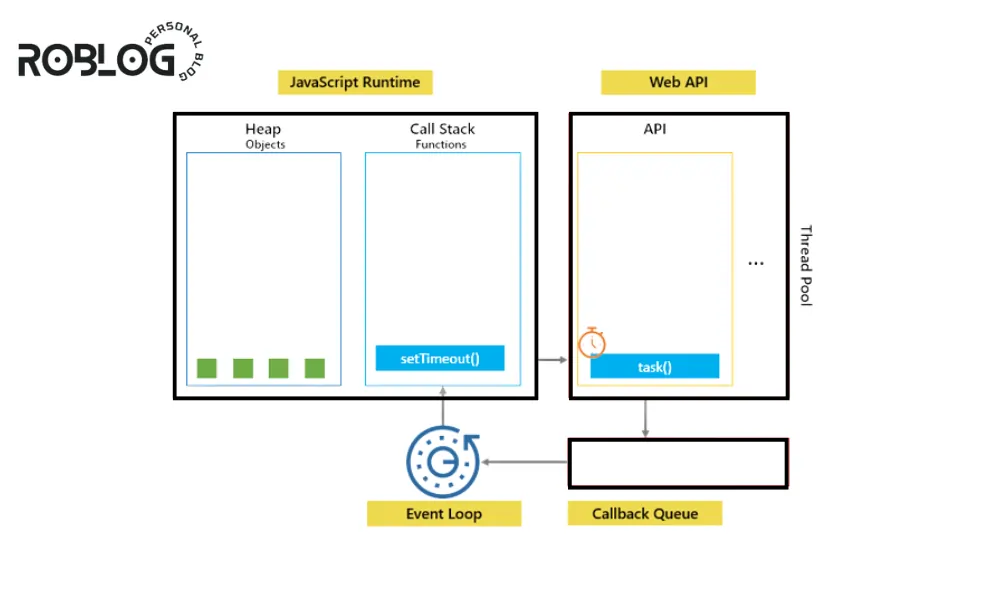
Since the
call stackis empty, the event loop removes the task function from thecallback queue, pushes it onto the call stack, and executes it.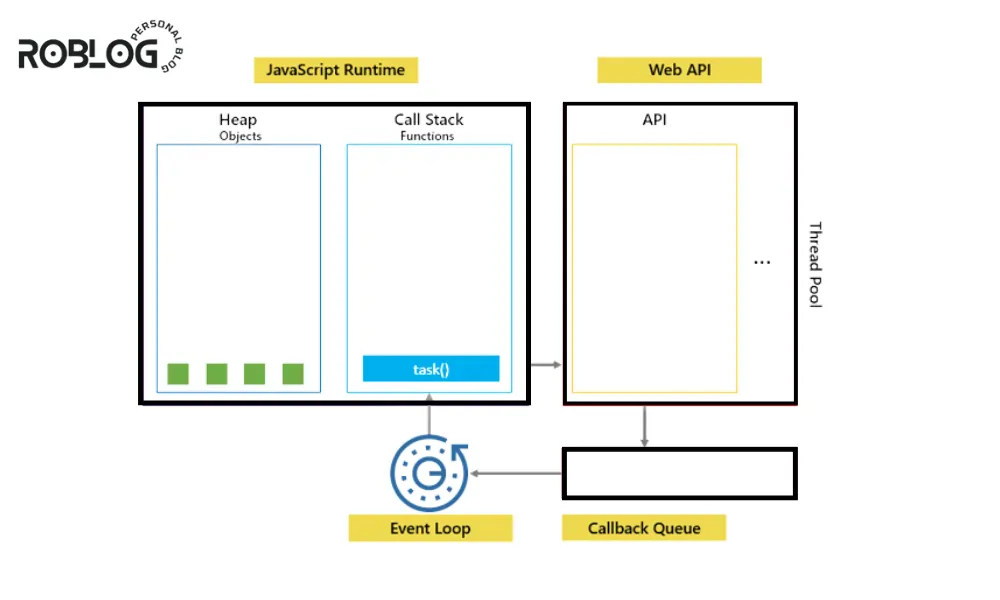
Inside the task function, the
console.log()statement is executed, creating a new function execution context.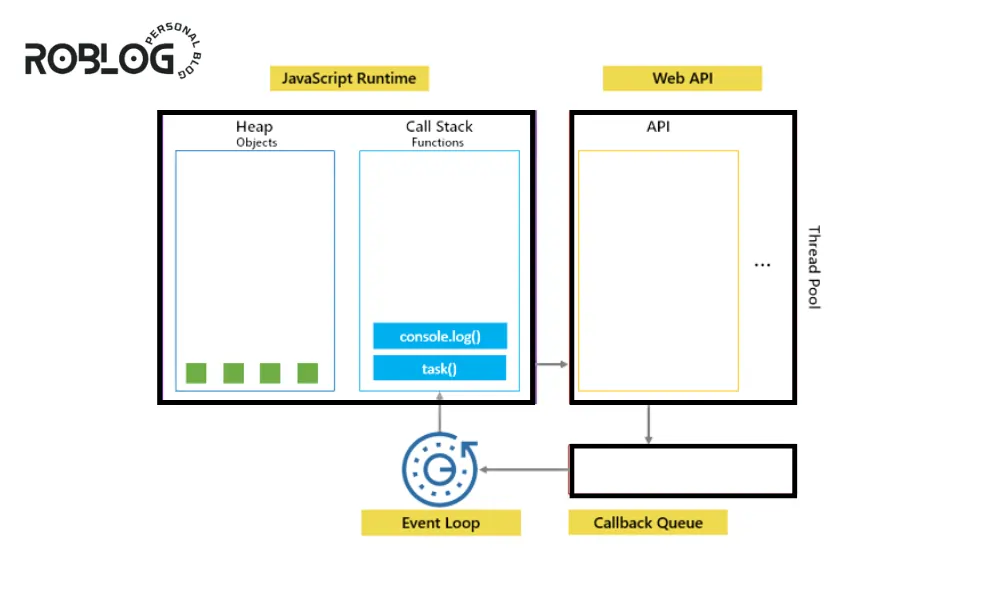
Finally, when the
console.log()and task function are completed, they are popped out of thecall stack.
By following this process, JavaScript can handle asynchronous tasks, such as delayed execution with setTimeout, without blocking the execution of other code.
The this Problem
When using setTimeout with a method, you may encounter a this keyword problem, where the value of this inside the method differs from your expectation.
This issue arises due to the way setTimeout works and the separate execution context it uses.
By default, when a method is invoked using setTimeout, the this value inside the method is set to the window (or global) object instead of the object you intended.
This behavior can lead to unexpected results, as shown in the following example:
const myArray = ['zero', 'one', 'two']
myArray.myMethod = function (sProperty) {
  console.log(arguments.length > 0 ? this[sProperty] : this)
}

myArray.myMethod() // prints "zero,one,two" (the whole array)
myArray.myMethod(1) // prints "one"
In the above example, when myMethod is called directly on myArray, the this value is correctly set to myArray.
However, when using setTimeout with myArray.myMethod, the this value defaults to the window object.
To overcome this issue, there are a few solutions you can employ:
Use a wrapper function:
A common approach is to use a wrapper function that explicitly sets the desired this value:
setTimeout(function () {
    myArray.myMethod()
}, 1000) // prints "zero,one,two" after 1 seconds

setTimeout(function () {
   myArray.myMethod('1')
}, 2500) // prints "one" after 2.5 seconds
Arrow function as the wrapper function:
Arrow functions do not bind their own
thisvalue and instead inherit it from the surrounding scope.This behavior can be leveraged to maintain the expected
thisvalue inside the callback function.Here's an example of using an arrow function as a callback with
setTimeout:const myArray = ['zero', 'one', 'two'] setTimeout(() => { myArray.myMethod() }, 1000) // prints "zero,one,two" after 1 seconds setTimeout(() => { myArray.myMethod('1') }, 2500) // prints "one" after 2.5 secondsIn this case, the arrow function does not have its own
thisbinding and instead uses thethisvalue from the surrounding scope, which is the expected value ofmyArray.Using an arrow function as a callback can provide a concise and convenient solution to the
thisproblem when working withsetTimeoutand methods.It's important to note that arrow functions have some differences in behavior compared to regular functions, so it's essential to consider their implications and choose the most suitable solution based on your specific use case.
  setTimeout(() => {
    myArray.myMethod()
  }, 1000) // prints "zero,one,two" after 1 seconds

  setTimeout(() => {
    myArray.myMethod('1')
  }, 2500) // prints "one" after 2.5 seconds
Use bind:
Another option is to use thebind()method to bind the desiredthisvalue to the method:const myArray = ['zero', 'one', 'two'] const myBoundMethod = function (sProperty) { console.log(arguments.length > 0 ? this[sProperty] : this) }.bind(myArray) myBoundMethod() // prints "zero,one,two" because 'this' is bound to myArray in the function myBoundMethod(1) // prints "one" setTimeout(myBoundMethod, 1000) // still prints "zero,one,two" after 1 second due to the binding setTimeout(myBoundMethod, 1500, '1') // prints "one" after 1.5 secondsBy using
bind(), you create a new function that is permanently bound to the specifiedthisvalue, ensuring it remains consistent when passed tosetTimeoutor called elsewhere.
These solutions help resolve the this problem when using setTimeout with methods, allowing you to maintain the desired context and avoid unexpected behavior.
Nested timeouts
Nested timeouts refer to the situation where a setTimeout function is called within the callback function of another setTimeout.
This approach can be used to create a sequence of timed events or to introduce delays between consecutive actions.
Here's an example to illustrate nested timeouts:
setTimeout(function () {
  console.log('First timeout executed.')
   setTimeout(function () {
     console.log('Second timeout executed.')
      setTimeout(function () {
       console.log('Third timeout executed.')
     }, 2000)
   },1000)
 }, 500)
In this example, we have three setTimeout functions nested inside each other. Each setTimeout has its own callback function and delay.
The first setTimeout executes after 500 milliseconds, the second executes after 1000 milliseconds (1 second) from the first timeout, and the third executes after 2000 milliseconds (2 seconds) from the second timeout.
When you run this code, it will output the following:
First timeout executed.
Second timeout executed.
Third timeout executed.
By nesting timeouts, you can create a sequence of actions that occur at different time intervals. This can be useful for scenarios where you need to orchestrate a series of events or introduce delays between specific operations.
However, it's important to be mindful of the potential complexity that can arise from deeply nested timeouts. As the number of nested timeouts increases, the code can become harder to read and maintain.
In such cases, alternative approaches like using async/await or libraries/frameworks that handle asynchronous operations may be more appropriate.
Remember to use nested timeouts judiciously and consider other options depending on the complexity and requirements of your code.
Conclusion
The setTimeout function is a fundamental tool in JavaScript, enabling developers to create dynamic and interactive experiences on the web.
By mastering setTimeout, you gain the ability to control timing, schedule tasks, and build sophisticated applications. With the insights and examples shared in this blog, you're now equipped to leverage setTimeout effectively and unlock the full potential of JavaScript's timer capabilities.
Now you have a powerful tool at your disposal to handle timing-related tasks, manage delays, and create more interactive and dynamic web applications.
Remember to practice and experiment with setTimeout to deepen your understanding and unlock its full potential. With this knowledge, you are well-equipped to harness the power of setTimeout and enhance the functionality of your JavaScript applications.
Happy coding :)
Resource
https://developer.mozilla.org/en-US/docs/Web/API/setTimeout
https://www.javascripttutorial.net/javascript-bom/javascript-settimeout/


![Cannot redeclare block-scoped variable in TypeScript [Fixed]](/_next/image?url=https%3A%2F%2Fcdn.hashnode.com%2Fres%2Fhashnode%2Fimage%2Fupload%2Fv1701462077875%2Fedc24eaf-2ef6-4ed3-b33f-ab15d254a02f.webp&w=3840&q=75)